Jekyll Basic Usage
Jekyll是一款广受好评的静态博客系统,主要基于Ruby构建,某些功能也需要nodejs与python辅助。因为本博客系统也是基于Jekyll搭建的,就着刚学习搭建完成,写一篇博客总结一下Jekyll的具体使用。如果想要更系统地进行学习,请参考官方文档
Installation and Quik-start
~ $ gem install jekyll
~ $ jekyll new myblog
~ $ cd myblog
~/myblog $ jekyll serve
# => Now browse to http://localhost:4000
jekyll 基于Ruby, 由 gem 安装,如果安装遇上问题搜索一下 gem 国内原,也可参考仓库的 README 文档。 安装后 Jekyll 可以在命令行中调用,代码第二行便是调用 jekyll 工具新建了一个博客目录,这个目录结构可以看作是 Jekyll 使用的基本目录结构,在此基础上博客便能正常运转;进一步编辑可以在_post目录下按照基本格式添加内容,亦可对网站资源进行更为深入的定制。之后在相应的目录中调用 Jekyll 的调试服务器即可,jekyll 命令行api。
Site Model
作为一个只懂 H5, CSS 和 JS 的前端小白,使用 Jekyll 构建网站就必须得面对两个问题, YAML是个什么鬼 以及 全站的数据模型究竟是咋回事儿。顺道说一句,jekyll 是支持 JSON 和 CSV 的。
YAML
- YAML 是一种受到多种语言(python, ruby, c# …)广泛支持的数据格式,以小白的视点看基本就是和 JSON 一个意思,讲的牛逼一点,YAML是JSON的父集。
- YAML Yet Another Markup Language, which is easy to write and easy to read
- YAML is structured by indentation
- 健值对
key: value
- 基本数据结构
a: 123                     # an integer
b: "123"                   # a string, disambiguated by quotes
c: 123.0                   # a float
d: !!float 123             # also a float via explicit data type prefixed by (!!)
e: !!str 123               # a string, disambiguated by explicit type
f: !!str Yes               # a string via explicit type
g: Yes                     # a boolean True (yaml1.1), string "Yes" (yaml1.2)
h: Yes we have No bananas  # a string, "Yes" and "No" disambiguated by context.
picture: !!binary |        # binary data
  R0lGODdhDQAIAIAAAAAAANn
  Z2SwAAAAADQAIAAACF4SDGQ
  ar3xxbJ9p0qa7R0YxwzaFME
  1IAADs=
- 数组的 行内 与 缩进 表示
men: [John Smith, Bill Jones]
women:
  - Mary Smith
  - Susan Williams
- 多行字符串的表示
specialDelivery:  >
    Follow the Yellow Brick
    Road to the Emerald City.
street: |
        123 Tornado Alley
        Suite 16
- 一个综合一点的例子
receipt:     Oz-Ware Purchase Invoice
date:        2012-08-06
customer:
    first_name:   Dorothy
    family_name:  Gale

items:
    - part_no:   A4786
      descrip:   Water Bucket (Filled)
      price:     1.47
      quantity:  4

    - part_no:   E1628
      descrip:   High Heeled "Ruby" Slippers
      size:      8
      price:     133.7
      quantity:  1

bill-to:  &id001
    street: |
            123 Tornado Alley
            Suite 16
    city:   East Centerville
    state:  KS

ship-to:  *id001

specialDelivery:  >
    Follow the Yellow Brick
    Road to the Emerald City.
    Pay no attention to the
    man behind the curtain.
Front Matter
Font Matter,用官网的话说 ‘The front matter is where Jekyll starts to get really cool’。当一个文件头部有一块 YAML 内容时,这块内容会被 Jekyll 处理,同时该文件本身也变成了一个特殊文件,比如说 _posts 内的博客文件。需要注意的有两方面内容,第一 Front Matter 的格式规范;第二 常用变量的作用与文档查询
- Front Matter 必须出现在文章头部,换言之从第一行开始就好了
- Front Matter 被包裹在两行分割线内,这两道分割线必须是 [MUST] 三道杠
--- - Front Matter 内定义的数据可以在文件处理过程中通过 liquid 模版利用
- 对于全站通用的数据,可以在
_data目录内定义,如作者;或是在_config.yml内配置。
---
layout: post
title: Jekyll Basic Usage
author: xszhi
categories: tech_note
tag: Jekyll
---
-
查看变量时注意三方面内容。
- 目录结构有没有对应名称
- 相应模版中有没有调用
- 是否为 Jekyll 预定义
-
以下简单分析本例,, 更细致的使用见下一个章节。
layout: post表示在渲染时使用_layout目录下的post.html模版title: Jekyll Basic Usage数据通过模版post.html渲染时候的page.titleauthor: xszhi渲染时的page.author, 同时用于调用site.data.authors.xszhi, 请查看文件/_data/authors- 最后两行均是为了对文章内容进行进一步细分而设定的自定义数据
Call Data
数据的调用需要熟悉两方面内容
- liquid 模版语法,以及 Jekyll 对 liquid 的扩张
- 挂载数据的关键对象及其api
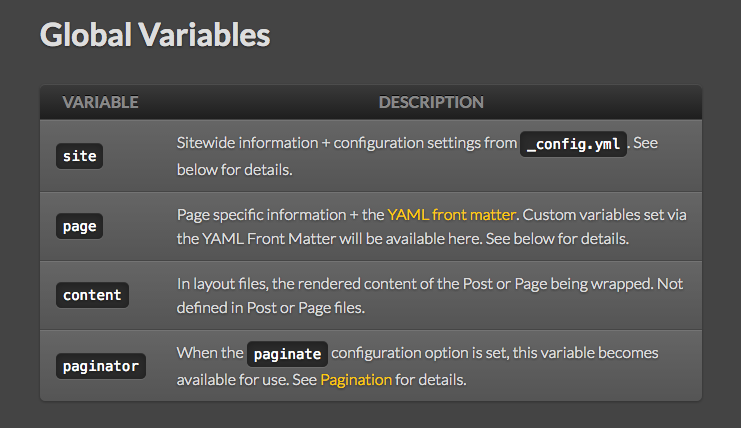
-
下图是想说明 Jekyll 的官方文档已经很详略得当了,建议大家过一遍 Variables, Templates 以及 Configuration这三个部分(我想测下图片是否能够正常显示),
Liquid 要点
- 核心概念有三个 Tag, Object, Filter
- Tag 完成流控制
- Objects 用于渲染内容
- Filter 用于修改,调整数据
<!-- TAG -->
{% if user.name == 'elvis' %}
  Hey Elvis
{% endif %}

<!-- Objects -->
<p>{{ page.title }}</p>
<!-- output  -->
<p> Jekyll Basic Usage </p>

<!-- Filters -->
{{ 'sales' | append: '.jpg' }}
<!-- Output: sales.jpg -->

{% end raw %}
- 操作符只包括逻辑和比较操作符
- Data Type 注意 Nil 和 EmptyDrop
{% assign my_string = "Hello World!" %}给变量赋值一个 str- 对于 Nil,需要注意的是,其被转换为 false
- Array的遍历操作
- 关于真假 在 liquid 内除了 nil 和 false 其它值均为真
- 以下是一些简单的例子,进一步熟悉可浏览
jekyll new <name>生成的代码,更多内容请参考官方文档
{% raw %}
<!-- Nil -->
{% if fulfillment.tracking_numbers %}
    There is a tracking number.
{% endif %}

<!-- Array -->
{% for tag in product.tags %}
    {{ tag }}
{% endfor %}

<!-- '' and false -->
{% unless settings.fp_heading == blank %}
    <h1>{{ settings.fp_heading }}</h1>
{% endunless %}
Misc
- 对于全站需要使用的配置信息可以在
config.yml中编辑,需要指出的是,config.yml 内容的修改并不会出发 jekyll 测试服务器的刷新。 - 页面的创建只是对模版渲染以及网站数据结构的综合运用。
- 关于样式,Jekyll 默认支持 sass。但是没有 sourcemap, 并不是特别爽,暂时还不知如何要爽由自己,有解决方式的同学,希望能够不吝赐教。
- 结合 Github 的发布是很容易的,个人或是组织,建立
<name>.github.io仓库(代码需要储存于master分支), 项目建立gh-page分支,上传代码即可。 - 评论功能的引入,建议使用百度的多说,简单快捷。当然 disquss 这样的库也是存在的
欢迎留言,转载,吐槽。